

This page describes how to build " basket weave" domes using flexible struts of PVC tubing and self-adjusting connectors made from short rods.
This dome is about 21.5 feet (6.5 meters) in diameter. It is constructed from 79 inch (2 meter) long pieces of 3/4 inch schedule 40 PVC pipe, the kind used commonly in home irrigation systems. Using this size lets you cut 3 struts out of one 20 foot piece of PVC pipe, and the size matches 20 foot diameter parachutes available from a military surplus store.
Walt's friend Joe Sterling rests inside the small PVC dome when it was set up in San Diego's Balboa Park.
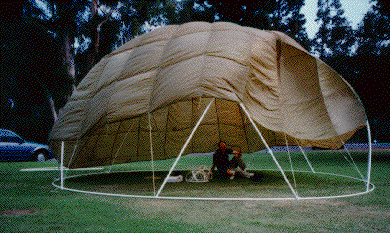
This dome is about 42 feet (12.7 meters) in diameter. It is constructed from pieces of 3/4 inch schedule 40 PVC pipe, cut to three different lengths -- 67 inches, 79 inches, and 83 inches. It uses the same type of connectors and one of the same strut lengths as the small dome. At this size, the PVC pipe turned out to be a weak point in the design. The dome would support its own weight, but if loads were placed on it (for example, if tarps were hooked over some of the faces) it would collapse inward like a deflated basketball. We would then have to push it back into shape with a long pole. This is a structure the size of a two-story house that sets up in 30 minutes and packs into a mid-size car! The plans on this page will let you build a dome of about this same size, but with an improved design that uses only two strut lengths rather than three.

Here are (L-R) Will Ackel, Michael Fisher, and Walt Venable inside the large PVC dome when it was set up at a park in Leucadia, California.
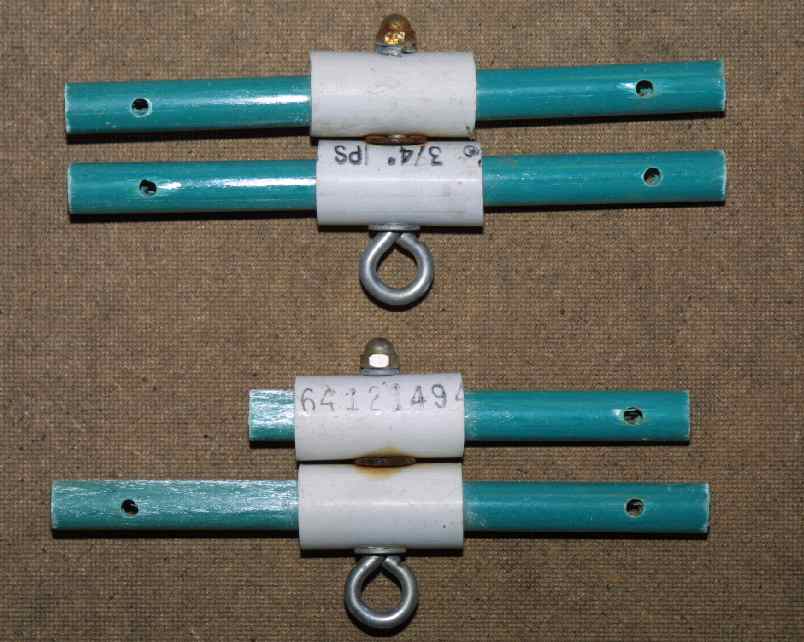
Here are detail shots of the various types of connectors used in these PVC domes (click on any image to enlarge it). There are 3-way connectors for the joints at the base, and 4-way connectors for all the other joints. Click on any image to enlarge it.
These connectors are all made out of short 5/8" to 3/4" outside diameter (O.D.) rods inside sleeves of 3/4" inside diameter (I.D.) PVC pipe, fastened together with 1/4" diameter bolts.
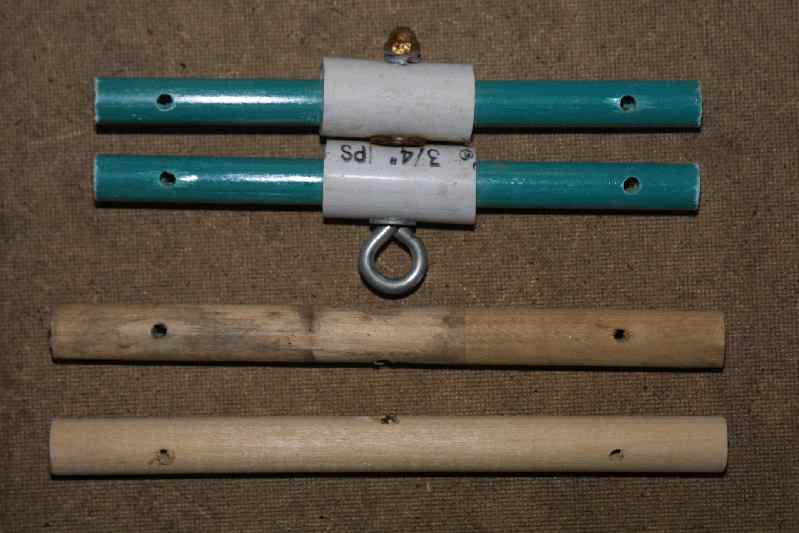
The first step is to select a rod material and cut pieces appropriate to the connectors you wish to make. The connectors shown in the above pictures use a 5/8" O.D. fiberglass tubing which I picked up as scrap. Also shown are some pieces of 3/4" O.D. diameter dowel which I originally used in the connectors. However, I had found the dowels would sometimes break if too much stress was applied to the dome structure. You could probably use pieces of 1/2" diameter thin-wall steel tubing (also called EMT, the tubing that is commonly used for electrical conduit). This tubing, though it is called 1/2", actually has an outside diameter of about 23/32" (just a little less than 3/4"), making it just the right diameter for these rods.
The four-way connectors use two identical rods, each 8" long. The three-way connectors use one 8" long and one 5 1/2" long rod. Each connector also uses two 2" long sleeves of 3/4" I.D. PVC pipe. The small 2-frequency dome shown above uses ten 4-way and ten 3-way connectors. This means a total of thirty 8", ten 5 1/2" long pieces of rod, and forty of the PVC sleeves (see 2f parts list below). The large 4-frequency dome uses thirty-five 4-way and twenty 3-way connectors, thus a total of ninety 8", twenty 5 1/2" long pieces of rod, and 110 of the PVC sleeves (see 4f parts list below). Cut all these pieces for the dome you want to build and set them aside. For the PVC pipe, investing in a PVC pipe cutter saves a LOT of work since it is quick and it makes very clean cuts. Using a hacksaw leaves an end with lots of burrs to be filed off.
Once the pieces of rod and PVC are cut (and the ends smoothed as required), they are ready for drilling. I used 1/4" diameter bolts, so get set up with a 1/4" drill bit (and a fairly heavy-duty drill if you're using steel tubing for the rods). If you have one, a drill press is best, as it gives better control and safety. Drill the 8" long pieces and the 2" PVC sleeves in the center, drill the 5 1/2" long pieces about 1 1/2" from one end. Be sure and "wiggle" each piece on the drill bit after you drill all the way through, this will help clean off any burrs and make the hole just a little bigger so the bolt will fit through more easily.
The final drilling step is to drill holes 1" in from each end of the 8" long pieces, and 1" in from the end of the 5 1/2" long pieces that has not yet been drilled. These holes will be used to join the finished connectors to the dome struts. Note that these holes are drilled at right angles to the bolt holes. This can be seen most clearly in the close-up of the left-hand picture of the 4-way and 3-way connectors, above. For this step, drill a 1/4" hole 1" in from each end of the 8" pieces and 1" in from the undrilled end of the 5 1/2" pieces. Again, a drill press is very good to use because it makes it much easier to control the pieces being drilled. Once all the connector pieces have been processed, do a quick check for any sharp edges or burrs and file them off.
Once you've cleaned up the pieces, it's time to bolt the pieces together into finished connectors. What type of 1/4" hardware you use is a matter of personal preference. If your dome will be set up outside unprotected for long periods of time, you may wish to invest in stainless-steel hardware. This can cost two to three times as much as regular zinc-plated steel bolts, though, which work just fine for most applications. The bolts themselves can be regular hex-head types. However, many times I find it useful to use eyebolts, with the "eye" pointed toward the inside of the connector (see the close-up of the 4-way and 3-way connectors). This lets you hang things from the eyebolts using bungee cords or other hangers. Again, it's a tradeoff, the eyebolts can be very handy but are more expensive.
The struts are much simpler to make than the connectors. They are all made of 3/4" I.D. PVC pipe, and all you need to do is cut them to length and drill a hole near each end to match the holes at the end of the connector pieces.
The small two-frequency domepictured above has only one edge length, called "b", whose length is about 0.6283 times the desired dome radius. When calculating the actual strut lengths to cut, note that the struts do not reach all the way to the center of the connectors. Rather, due to the length of the little PVC sleeves, at each end the struts stop 1" from the center of the connector's bolt. For this reason, subtract 2" (0.1667 feet) from your calculated strut lengths to get the actual lengths to cut.
For example, the 2-frequency dome pictured on this page has a diameter of about 21.5 feet, radius of 10.75 feet. Thus the "b" strut would be ( 10.75 x 0.6283 ) - 0.1667 = 6.5875 feet = 79.05". Note that this dimensions don't actually have to be measured to four digits of accuracy, if it's a bit smaller, then the dome will just be a bit smaller also.
The large four-frequency domeplans here have two edge lengths, an improvement over the three edge lengths for the dome pictured above. The shorter edge length is called "b", and is about 0.2648 times the desired dome radius. The longer is called "c", and is about 0.3147 times the desired dome radius. Again, when calculating the actual strut lengths to cut, note that the struts do not reach all the way to the center of the connectors. Due to the little PVC sleeves, subtract 2" (0.1667 feet) from your calculated strut lengths to get the actual lengths to cut.
For example, the 4-frequency dome pictured above has a diameter of 42 feet, radius of 21 feet. Thus the "b" strut would be ( 21 x 0.2648 ) - 0.1667 = 5.3941 feet = 64.73". The "c" strut would be ( 21 x 0.3147 ) - 0.1667 = 6.442 feet = 77.30". However, to enable us to build both the 2f and the 4f dome from the same "kit of parts," then we should adjust the strut lengths so the "c" strut is the same length as the "b" strut for the 2f dome. To do this, we calculate backwards to obtain the radius from the "c" strut length. If we want the strut to be 79" long, the the radius is (79" + 2") / 0.3147 = 257.4" = 21.45 feet. Using this as our new radius, the 4f dome's "b" strut would be ( 21.45 x 0.2648 ) - 0.1667 = 5.5133 feet = 66.16", or about 66 5/32". Again, these dimensions don't actually have to be measured to four digits of accuracy, just make it as close as you can. Note that because this dome is only 3/8 of a sphere, the radius of the floor is 0.922 of the sphere's radius, so for our 21.45 foot dome radius, the floor radius will be about 19.78 feet.
Once you have calculated the strut lengths for your size dome, cut enough pieces to length for the entire dome (see Parts Lists below for number of struts). The final step is to drill a 1/4" hole 2" in from each end of each strut, perpendicular to the long axis of the strut. Make sure that the holes at each end are drilled through in the same direction, that is, if you passed a bolt through the hole at each end, the bolts would be parallel to each other.
| Qty | Item Description |
|---|---|
| 30 | 8" long rods |
| 10 | 5 1/2" long rods |
| 40 | 2" long PVC sleeves |
| 20 | 2 1/2" long, 1/4" diameter hex head bolts or eyebolts |
| 20 | Washers for 1/4" bolts (need 40 if using eyebolts) |
| 20 | 1/4" lockwashers |
| 20 | 1/4" hex nuts |
| 35 | 79" long "b" struts, 3/4" I.D. PVC pipe |
| 70 | 4 to 5" long pieces of insulated #12 solid wire |
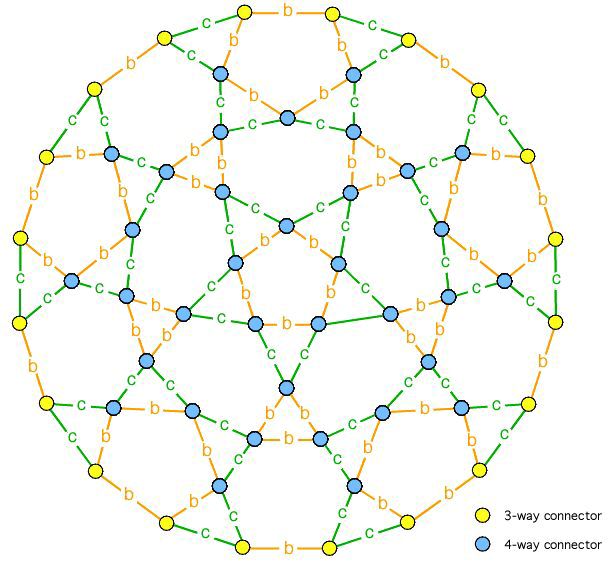
Once all the parts are fabricated, assembly of the dome is fairly straightforward. This diagram shows a top view of the dome, with the struts and different types of connectors designated:

Since these domes are very lightweight, it is usually easiest to assemble the top of the dome first and then work your way out from there. This means starting by assembling the pentagonal arrangement of five "b" struts. (The struts are attached to the connectors by sliding the end of a strut over the appropriate end of a connector. Line up the holes in the strut end with those in the connector end, then slide one of the pieces of wire through both sets of holes and twist the ends of the wire together a few times to keep the wire from falling out.) Then add the triangles of two additional struts to each of these first 5 struts to form a five-pointed star shape. Add another triangle of three struts to the bottom tip of these last triangles to form the bottom set of triangles that will rest on the ground. The PVC tubing is floppy enough to permit this kind of assembly with everything fairly flat on the ground. Finally, while lifting up on the top ring of struts, use the last five struts to join the bottom corners of the last set of triangles, thereby forming the five pentagons that sit on the ground. When all the pentagons are formed, the dome should be "popped up" up into its proper hemispherical shape.
| Qty | Item Description |
|---|---|
| 90 | 8" long rods |
| 20 | 5 1/2" long rods |
| 110 | 2" long PVC sleeves |
| 55 | 1" long 1/4 " diameter hex head bolts or eyebolts |
| 55 | Washers for 1/4" bolts (need 110 if using eyebolts) |
| 55 | 1/4" lockwashers |
| 55 | 1/4" hex nuts |
| 30 | 66 5/32" long "b" struts, 3/4" I.D. PVC pipe |
| 35 | 79" long "c" struts, 3/4" I.D. PVC pipe |
| 200 | 4 to 5" long pieces of insulated #12 solid wire |
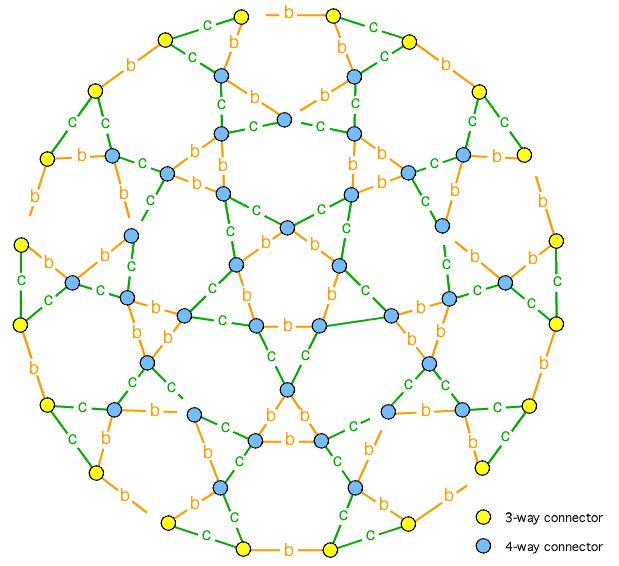
Once all the parts are fabricated, assembly of the dome is fairly straightforward, although you'll want to have 2 or 3 people to help you since it's so large. This diagram shows a top view of the dome, with the different types of struts and connectors designated:
Since these domes are fairly lightweight, it is usually easiest to assemble the top of the dome first and then work your way out from there. This means starting by assembling the pentagonal arrangement of five "b" struts. (The struts are attached to the connectors by sliding the end of a strut over the appropriate end of a connector. Line up the holes in the strut end with those in the connector end, then slide one of the pieces of wire through both sets of holes and twist the ends of the wire together a few times to keep the wire from falling out.) Then add the triangles of two "b" struts to each of these first five struts to form a five-pointed star shape. Add another triangle of three "b"struts to the bottom tip of these last triangles. The PVC tubing is floppy enough to permit this kind of assembly with everything fairly flat on the ground. Continue adding struts in a systematic manner until the whole pattern is laid out on the ground, with strategic breaks in the pattern every 1/5 of a circle to enable it to lie on the ground. One possible intermediate stage assembly pattern is shown here:
Finally, while lifting up on the top ring of struts, keep joining up the gaps in the pattern, again working your way down from the top (center) of the pattern. When all the loose strut ends are joined to the corresponding connector ends, the dome should be "popped up" up into its proper 3/8 hemispherical shape.
(return to Walt's Dome Pagemain page)