
This page describes how to build domes using straight struts of fiberglass (or other any other hollow tubular material, such as PVC tubing) and connectors made from thin-wall steel tubing.
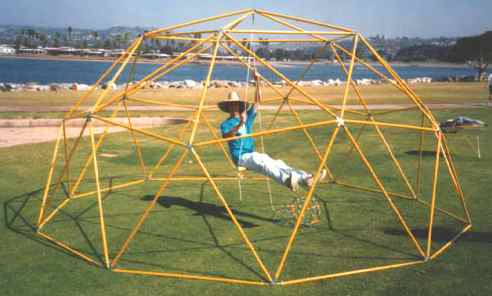
This dome is about 17 feet (5.2 meters) in diameter. It is constructed from pieces of fiberglass tubing (the kind sometimes used now for broom handles) and connectors made from steel tubing.
Walt hangs from a swing when the dome was set up at a dome meeting in San Diego. Click on the picture for a larger version of this image.
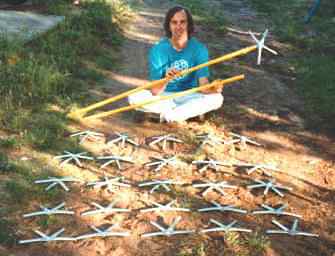
Walt poses with all the connectors used in this dome -- (6) 5-way, (10) 6-way, and (10) 4-way connectors. Also shown are two struts, one of each length used in the dome. Click on the picture for a larger version of this image.
Here are detail shots of the various types of connectors used in domes of this type (click on any image to enlarge it).
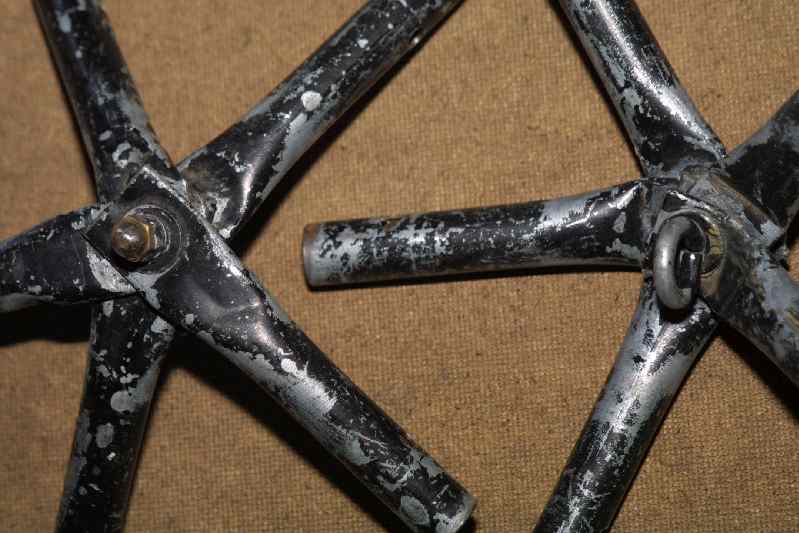
6-way Connectors -- these are used anywhere six struts come together:
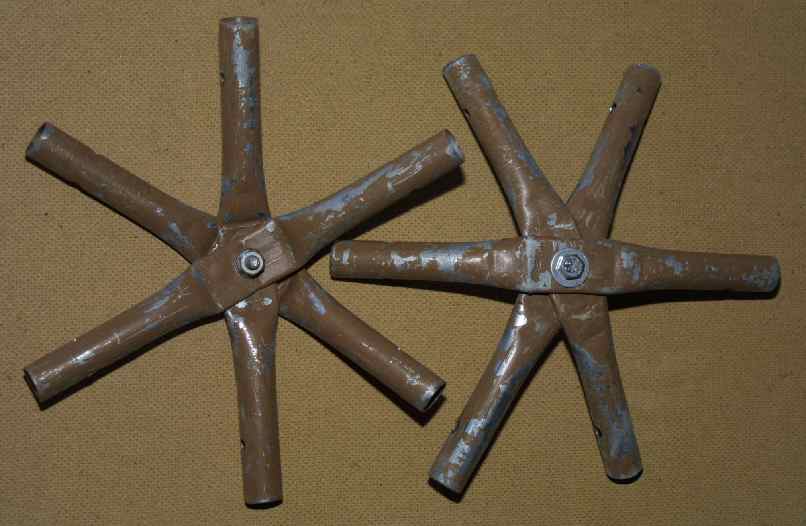
5-way Connectors -- these are used at the vertices of the icosahedron on which these particular domes are based, where five struts come together:
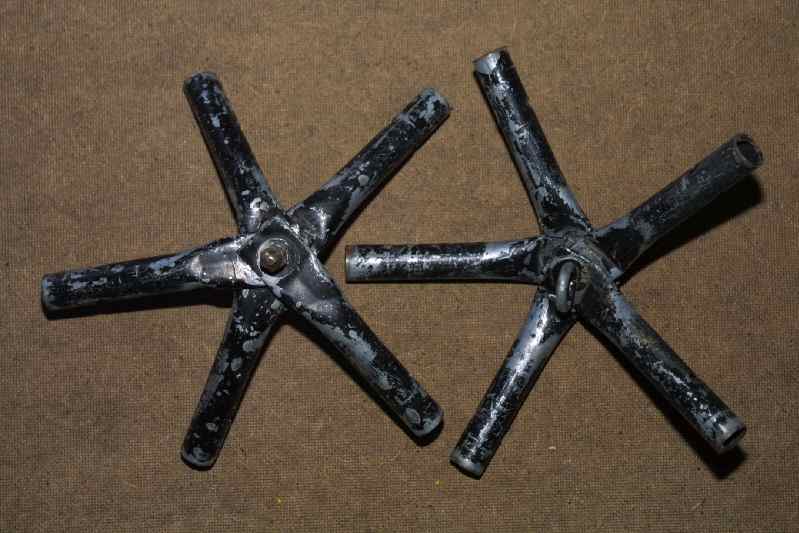
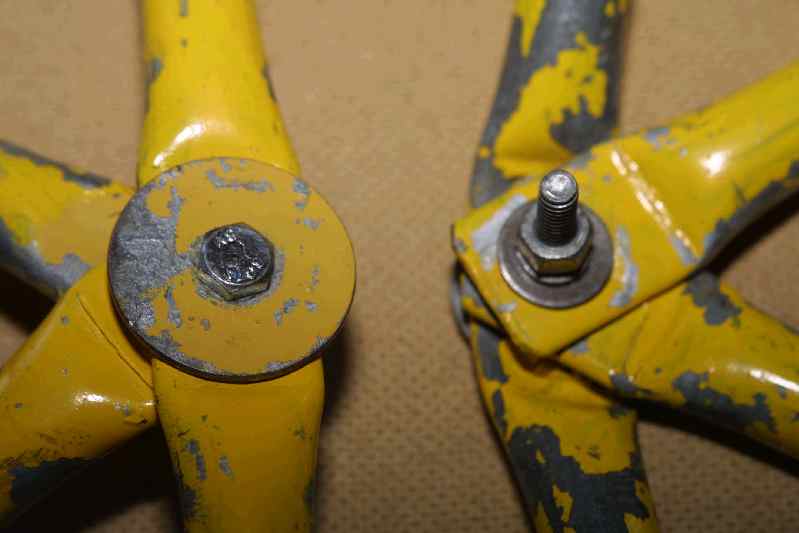
4-way Connectors -- these are used at the base of the dome, where it rests on the ground:
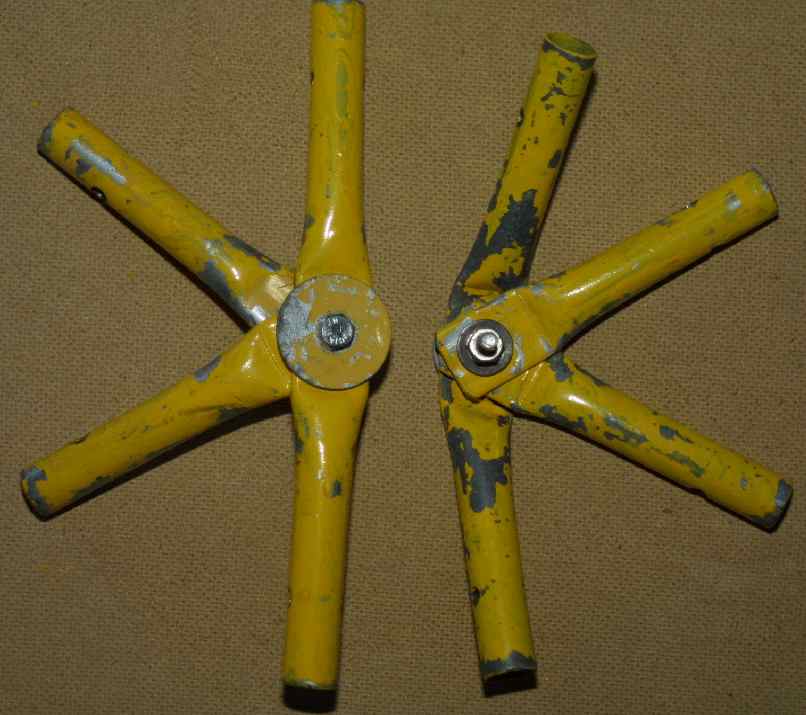
These connectors are all made out of short lengths of 1/2" inside diameter thin-wall steel tubing (also called "EMT", it is the kind commonly used for electrical conduit), fastened together with 1/4" diameter bolts.
The first step is to cut lengths of the steel tubing appropriate to the connectors you wish to make. The six-way connectors use three identical pieces of tubing, each 9" long. The five-way connectors use five identical pieces of tubing, each 5" long. The four-way connectors use one of the 9" and two of the 5" long pieces. The 2-frequency dome shown above uses ten 6-way, six 5-way, and ten 4-way connectors. This means a total of forty 9" and fifty 5" long pieces. Cut all these pieces and set them aside (you'll probably find, as I did, that it's easier to process all parts at each step, assembly-line style, before proceeding to the next step). Cut the tubing with a hacksaw (may leave rough ends that need to be filed down) or a tubing cutter.
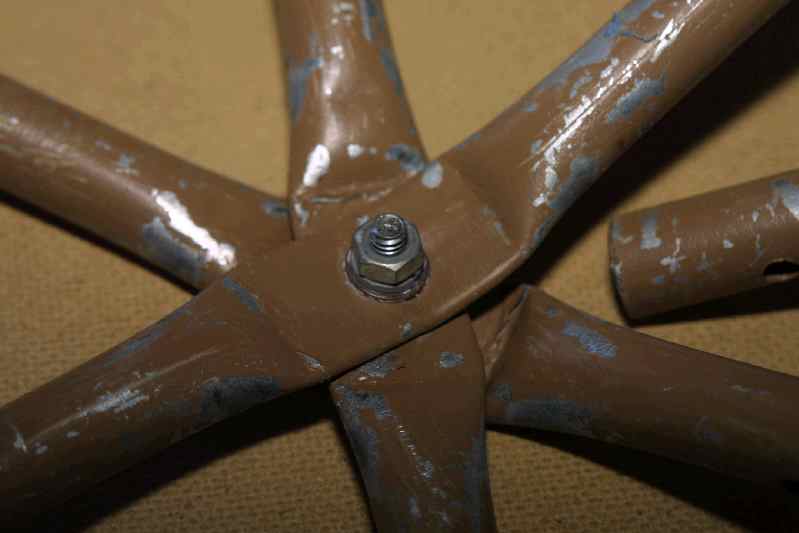
Once the pieces are cut (and filed smooth as required), you must flatten the portion of each piece where the bolt will pass through. For the 9" long pieces, this means flattening the center 2" of each piece. For the 5" long pieces, this means flattening 1.5" at one end of each piece. Flattening can be done using many methods. You can try flattening in a heavy-duty metal vise, but most vise makers don't recommend this much stress. To make the connectors here I pounded them flat with a little 6-pound sledge hammer on an anvil. A more sophisticated approach would be to use an arbor press or hydraulic press with suitably-sized pressing plates.
Now all the pieces are ready for drilling. I used 1/4" diameter bolts, so get set up with a 1/4" drill bit and a fairly heavy-duty drill (we're drilling through steel). If you have one, a drill press is best, as it gives better control and safety. Drill the 9" long pieces in the center of the flattened section, drill the 5" long pieces about 1/2" from the end of the flattened section. Make sure you use some form of oil to cool the drill bit as it cuts through the steel, this will prolong the life of your drill bit. Be sure and "wiggle" each piece on the drill bit after you drill all the way through, this will clean off any burrs and make the hole just a little bigger so the bolt will fit through more easily.
The final metalworking step is to drill holes 1" in from each non-flattened end of the connector pieces. These holes will be used to join the finished connectors to the dome struts. Note that these holes are drilled at right angles to the bolt holes. This can be seen most clearly in the close-up of the left-hand picture of the 6-way connectors, above. For this step, drill a 1/4" hole 1" in from each end of the 9" pieces and 1" in from the non-flattened end of the 5" pieces. Again, a drill press is very good to use because it makes it much easier to control the pieces being drilled.
Now that all the connector pieces have been processed, do a quick check for any sharp metal edges or burrs and file them off using a round metal file or a grinding wheel. At this point you may wish to clean the oil from the connector pieces and paint them with rust-resistant paint (e.g. Rustoleum). As you can see, I color-coded the pieces that were to make up each type of connector. This makes it easier to sort them out later, and also to quickly explain the dome assembly process to others (e.g., "grab two of the brown connectors").
Once you've cleaned up the pieces and the paint (if any) has dried, it's time to bolt the pieces together into finished connectors. What type of 1/4" hardware you use is a matter of personal preference. If your dome will be set up outside unprotected for long periods of time, you may wish to invest in stainless-steel hardware. This can cost two to three times as much as regular zinc-plated steel bolts, though, which work just fine for most applications. The bolts themselves can be regular hex-head types (see the close-up of the 4-way connector). However, many times I find it useful to use eyebolts, with the "eye" pointed toward the inside of the connector (see the closeup of the 5-way connector). This lets you hang things from the eyebolts using bungee cords or other hangers. Again, it's a tradeoff, the eyebolts can be very handy but are more expensive.
The struts are much simpler to make than the connectors. All you need to do is cut them to length and drill a hole near each end to match the holes at the end of the connector pieces. The struts that I used in the dome photo at the top of the page were 3/4" inside diameter (I.D.) fiberglass tubing. I got this as scrap material, but you can use any lightweight, fairly sturdy tubing for the struts. One good choice might be the grey type PVC irrigation pipe, which is fairly resistant to sunlight. Or, if you had access to a large supply of wooden dowels that just fit inside the connector ends, you could reverse things -- instead of the strut being hollow and fitting over the connector end, the strut could be solid and slide inside the connector ends. If you had larger-diameter dowels (like broomsticks) you could use larger diameter steel tubing for the connectors and adjust their dimensions somewhat.
The two-frequency dome pictured above has two edge lengths. The shorter is called "a", and is about 0.5465 times the desired dome radius. The longer edge length is called "b", and is about 0.6180 times the desired dome radius. When calculating the actual strut lengths to cut, note that the struts do not reach all the way to the center of the connectors. Rather, due to the placement of the attachment holes, at each end the struts stop about 1 1/2" from the center of the connector's bolt. For this reason, subtract 3" (0.25 feet) from your calculated strut lengths to get the actual lengths to cut.
For example, the dome pictured on this page has a diameter of 17 feet, radius of 8.5 feet. Thus the "a" strut would be ( 8.5 x 0.5465 ) - 0.25 = 4.3953 feet = 52.74". The "b" strut would be ( 8.5 x 0.6180 ) - 0.25 = 5.0030 feet = 60.03". Note that these dimensions don't actually have to be measured to four digits of accuracy, these simpler domes are rather forgiving.
Once you have calculated the strut lengths for your size dome, cut enough pieces to length for the entire dome. The 2-frequency dome shown here uses 30 of the "a" struts and 35 of the "b" struts. The final step is to drill a 1/4" hole 2" in from each end of each strut, perpendicular to the long axis of the strut. Make sure that the holes at each end are drilled through in the same direction, that is, if you passed a bolt through the hole at each end, the bolts would be parallel to each other.
| Qty | Item Description |
|---|---|
| 40 | 9" long steel tubing pieces |
| 50 | 5" long steel tubing pieces |
| 26 | 1" long, 1/4" diameter hex head bolts or eyebolts |
| 52 | Regular or large-diameter ("fender") washers for 1/4" bolts |
| 26 | 1/4" lockwashers |
| 26 | 1/4" hex nuts |
| 30 | 52.74" long "a" struts (fiberglass or other tubing material) |
| 35 | 60.03" long "b" struts (fiberglass or other tubing material) |
| 130 | 4 to 5" long pieces of insulated #12 solid wire |
Once all the parts are fabricated, assembly of the dome is fairly straightforward. This diagram shows a top view of the dome, with the different types of struts and connectors designated:
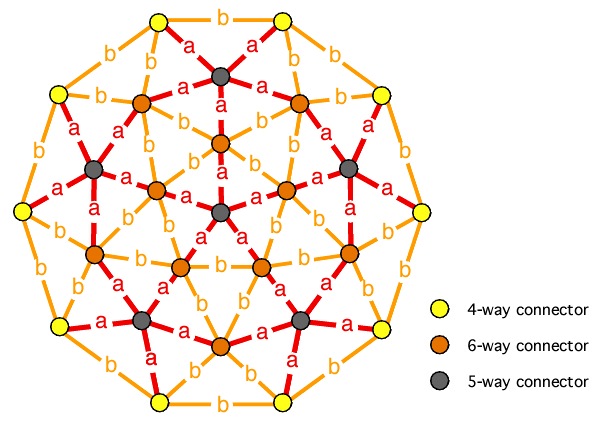
Since these domes are fairly lightweight, it is usually easiest to assemble the top of the dome first and then work your way down, lifting the assembled sections up as you go. This means starting with the pentagonal arrangement of five "a" struts surrounded by five "b" struts and working your way down. The struts are attached to the connectors by sliding the end of a strut over the appropriate end of a connector. Line up the holes in the strut end with those in the connector end, then slide one of the pieces of wire through both sets of holes and twist the ends of the wire together a few times to keep the wire from falling out.
(return to Walt's Dome Page main page)